登入
SSH Login with root
設定時區
timedatectl set-timezone Asia/Taipei開port
service firewalld restart;firewall-cmd --zone=public --add-port=15678/tcp --permanent;firewall-cmd --reloadfirewall-cmd --zone=public --add-port=80/tcp --permanentfirewall-cmd --zone=public --add-port=8088/tcp --permanentfirewall-cmd --zone=public --add-port=8090/tcp --permanentfirewall-cmd --zone=public --add-port=443/tcp --permanentfirewall-cmd --reloadfirewall-cmd --zone=public --list-allsystemctl enable firewalld安裝環境及基本軟體
yum install –y zip unzip wget java上傳wowza
用 Winscp 上傳 Wowza Streaming Engine v4.8.14+9 Linux.zip
unzip Wowza\ Streaming\ Engine\ v4.8.14+9\ Linux.zip更改wowza認證伺服器指向
vi /etc/hosts加入以下
127.0.0.1 wowzamedia.com
127.0.0.1 wowzalicense1.wowzamedia.com
127.0.0.1 wowzalicense2.wowzamedia.com
127.0.0.1 wowzalicense3.wowzamedia.com
127.0.0.1 wowzalicense4.wowzamedia.com
127.0.0.1 wowzalicense5.wowzamedia.com
127.0.0.1 wowza.netmasters.nl
127.0.0.1 www.towza.com
127.0.0.1 www.towza.tom
安裝 wowza
cd Wowza\ Streaming\ Engine\ v4.8.14+9\ Linuxchmod +x ./WowzaStreamingEngine-4.8.14+9-linux-x64-installer_Downloadly.ir.run./WowzaStreamingEngine-4.8.14+9-linux-x64-installer_Downloadly.ir.run按68次Enter
y
輸入KEY
ET1A4-KxrGd-Eaj9T-dTbcf-rZNza-9xaJd
輸入user name 及 password
admin
admin@root
y
y
安裝破解檔
cp Crack/wms-server.jar /usr/local/WowzaStreamingEngine-4.8.14+9/liby
重啟wowza
service WowzaStreamingEngine restartservice WowzaStreamingEngineManager restart關閉自動更新
cd Crack/disable\ update\ watch/cp * /usr/local/WowzaStreamingEngine/manager/temp/webapps/enginemanager/WEB-INF/classes/org/apache/jsp/tag/web/wmsform/y
y
再重啟wowza
service WowzaStreamingEngine restartservice WowzaStreamingEngineManager restart登入wowza後台
輸入帳密
Applications->vod->edit
只留Apple HLS
Save
Restart Now
安裝 Let’s encrypt snap for Wowza server
安裝epel
yum -y install epel-releaseyum -y upgrade安裝snap
yum install -y snapdsystemctl enable --now snapd.socketln -s /var/lib/snapd/snap /snapcdvi ~/.bashrc加入:
PATH=$PATH:/var/lib/snapd/snap/bin
載入 .bashrc:
source ~/.bashrc
service snapd restartsnap install core; snap refresh coresnap install --classic certbot申請SSL
/var/lib/snapd/snap/bin/certbot certonly --key-type rsa --standalone -d 域名輸入:
y
n
每月自動檢查更新SSL憑證
crontab -e加入:
@monthly root /var/lib/snapd/snap/bin/certbot certonly --key-type rsa --quiet --standalone --renew-by-default -d 域名 >> /var/log/letsencrypt/letsencrypt-auto-update.log查詢憑證有效日期
sudo openssl x509 -in /etc/letsencrypt/live/域名/fullchain.pem -noout -dates手動更新SSL憑證(沒自動更新時,可手動更新)
sudo /var/lib/snapd/snap/bin/certbot certonly --key-type rsa --standalone -d 域名選2(renew)
cd /usr/local/WowzaStreamingEngine/libsudo java -jar wowza-letsencrypt-converter-0.2.jar -v /usr/local/WowzaStreamingEngine/conf/ /etc/letsencrypt/live/sudo service WowzaStreamingEngine restartsudo service WowzaStreamingEngineManager restart安裝SSL憑證到WOWZA
cd /usr/local/WowzaStreamingEngine/libwget https://github.com/robymus/wowza-letsencrypt-converter/releases/download/v0.2/wowza-letsencrypt-converter-0.2.jarjava -jar wowza-letsencrypt-converter-0.2.jar -v /usr/local/WowzaStreamingEngine/conf/ /etc/letsencrypt/live/cat /usr/local/WowzaStreamingEngine/conf/jksmap.txt會顯示:
域名={“keyStorePath”:”/usr/local/WowzaStreamingEngine/conf/域名.jks”, “keyStorePassword”:”secret”, “keyStoreType”:”JKS”}
編輯VHost.xml開啟wowza SSL設定:
vi /usr/local/WowzaStreamingEngine/conf/VHost.xml找到<!– 443 with SSL –>
將下面的<!–及–>刪除
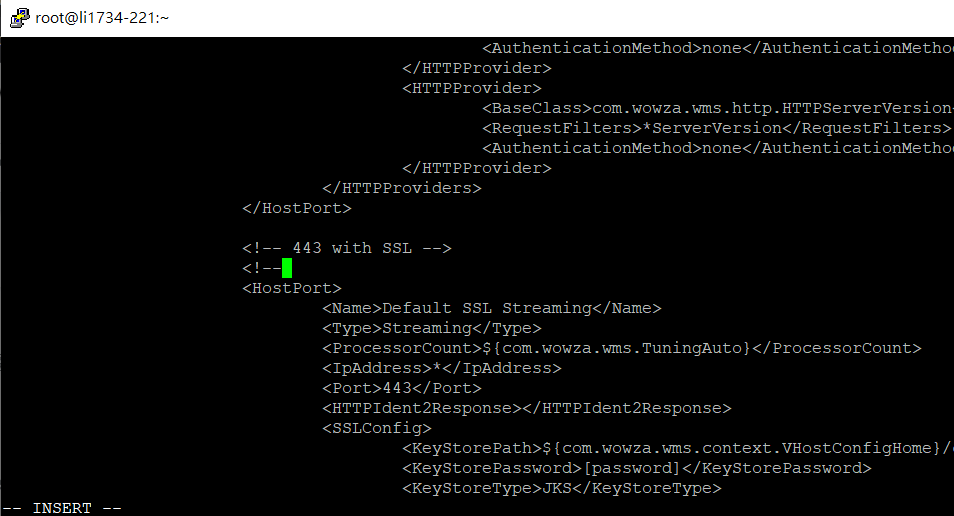

再依 cat /usr/local/WowzaStreamingEngine/conf/jksmap.txt 的內容修改兩處

編輯
vi /usr/local/WowzaStreamingEngine/manager/conf/tomcat.properties拿掉三處註釋並修改兩處

登入wowza server
到 Server > Virtual Host Setup 按 Edit
找到下圖這行
再按後面的筆來編輯

改為下圖, Apply及Save後, Restart Now

如果port 1935也要走SSL, 就改相同設定即可
再重啟wowza
service WowzaStreamingEngine restartservice WowzaStreamingEngineManager restart在cms server上加入驗證token
開啟 PHP putenv function
在cms server上:
vi /www/server/php/56/etc/php.ini將disable_functions裡的putenv移除
※寶塔或aapanel到php設定裡將Disabled functions裡的putenv移除
重啟php:
service php-fpm restart※寶塔或aapanel到PHP設定裡重啟
安裝zip, unzip
yum install -y zip unzip安裝composer
curl -s http://getcomposer.org/installer | php安裝 WowzaSecureToken For PHP
vi composer.json輸入:
{
“require”: {
“remiheens/php-wowza-securetoken” : “0.1.2”
}
}
執行:
./composer.phar installcopy vendor 到token PHP的目錄下:
cp -r vendor/ /www/wwwroot/域名/videophp寫法看範例檔:
secure.php
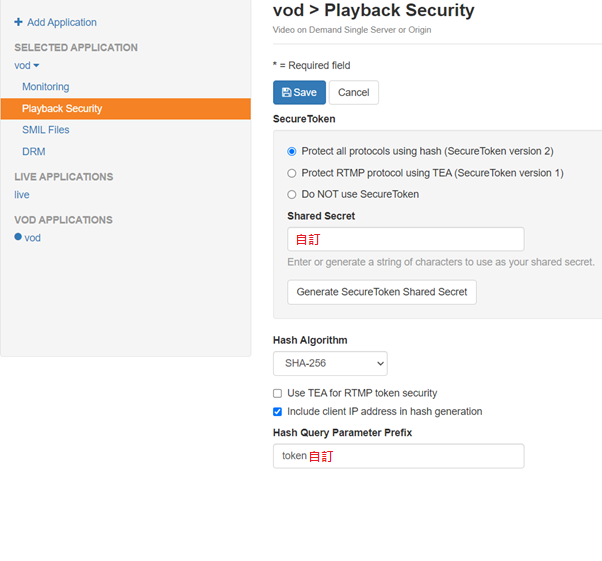
wowza server 開啟 security token
將不同硬碟mount後,加入wowza串流
登入wowza server
Server->Media Cache->Source->+Add Media Cache Source

新增sftp上傳使用者
useradd -s /sbin/nologin uploadmp4passwd uploadmp4vi /etc/ssh/sshd_config加入以下:
Match user uploadmp4
ChrootDirectory /hdd
AllowTcpForwarding no
X11Forwarding no
ForceCommand internal-sftp
※注意 /hdd 的權限必需是 root 及 755 使用者才能登入
※掛上去的硬碟再用root去更改權限,讓使用者可以上傳
例如:
chown uploadmp4.uploadmp4 /hdd/sdbchown uploadmp4.uploadmp4 /hdd/sdcchown uploadmp4.uploadmp4 /hdd/sdd